
WordPress powers over 40% of all websites on the internet, and one of the main reasons developers and business owners choose it is how well it works with SEO. But “SEO-friendly platform” does not mean “automatically optimized.” Out of the box, a WordPress site still needs to be set up, configured, and maintained correctly if you want it to rank on Google.
This WordPress SEO guide for beginners walks you through every important setting, plugin, and optimization step, specifically inside WordPress. If you are looking for a broader introduction to how SEO works in general, our SEO Basics Guide is the right place to start. This guide picks up where that one leaves off: once you understand the theory, here is exactly how to put it into practice on your WordPress site.
Let’s go step by step.
Step 1: Build the Right Foundation Before Anything Else
SEO improvements built on a weak foundation will only take you so far. Before you touch any plugin or content setting, make sure these three fundamentals are in place.
Choose a Lightweight, Fast Theme
Your WordPress theme has a direct impact on your site’s speed, and speed is a confirmed Google ranking factor. Themes loaded with unnecessary animations, heavy scripts, and bloated CSS will slow your site down regardless of how well everything else is optimized.
For beginners, lightweight themes like Astra, GeneratePress, or Kadence are excellent choices. They load fast, are mobile-responsive by default, and are built to work cleanly with SEO plugins. Avoid “all-in-one” premium themes that promise everything — they often deliver slow load times instead.
Enable HTTPS (SSL Certificate)
Google has used HTTPS as a ranking signal since 2014. If your site still loads on http:// instead of https://, you are at a disadvantage before a single word of content is written. Most hosting providers offer free SSL certificates through Let’s Encrypt, enable it in your hosting control panel and then update your WordPress URL settings under Settings → General.
Set Your Permalink Structure
Permalinks are your page URLs. WordPress defaults to a date-based structure like /?p=123, which is terrible for SEO. Go to Settings → Permalinks and switch to Post name. This gives you clean, keyword-friendly URLs like yourseoebook.com/wordpress-seo-guide-for-beginners/ – much easier for both Google and your readers to understand.
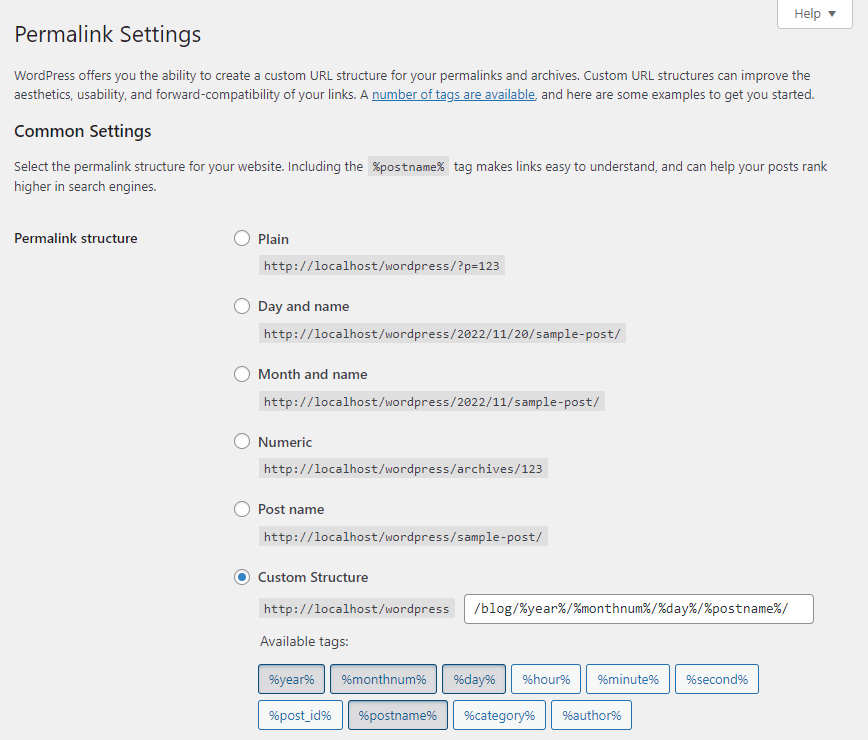
SCREENSHOT- WordPress Permalink Settings
Step 2: Install and Configure Your SEO Plugin
An SEO plugin is not optional for WordPress -it is the control center for everything from meta titles to sitemaps. The two most popular options are Rank Math and Yoast SEO. Both are excellent; the right choice depends on your comfort level.
Rank Math vs. Yoast SEO: Which Should You Use?
| Feature | Rank Math (Free) | Yoast SEO (Free) |
|---|---|---|
| Meta title & description editor | ✅ Yes | ✅ Yes |
| Schema / structured data | ✅ Built-in (multiple types) | ⚠️ Basic only (free) |
| XML sitemap | ✅ Yes | ✅ Yes |
| Redirect manager | ✅ Yes (free) | ❌ Paid only |
| Keyword tracking | ✅ Yes (free) | ❌ Paid only |
| Ease of use for beginners | ⚠️ More options (can feel complex) | ✅ Simpler interface |
For most beginners, Rank Math offers more features for free. But if you find its interface overwhelming, Yoast SEO is perfectly capable and easier to navigate. Install one, never both at the same time, as they will conflict.
Essential Settings to Configure After Installation
Once your plugin is installed, do not skip the setup wizard. Both Rank Math and Yoast walk you through the most important initial settings. After the wizard, confirm these are configured correctly:
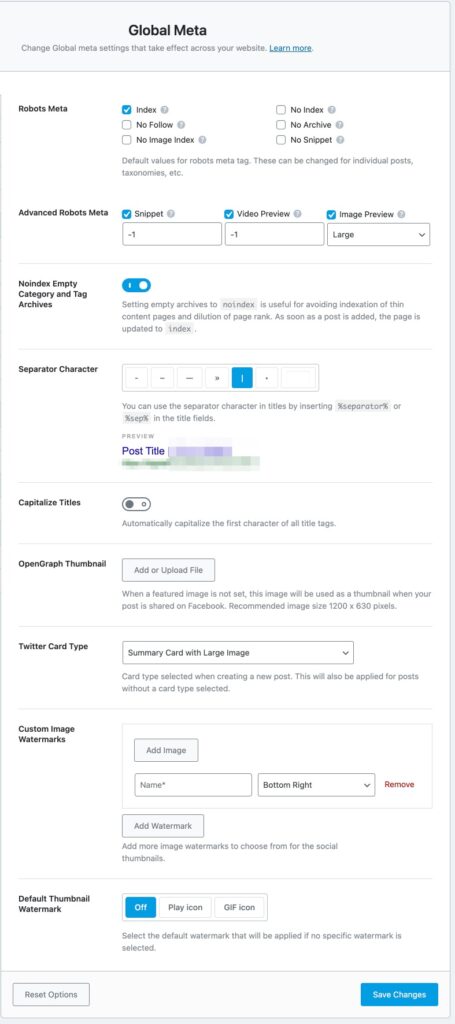
- Site title and tagline – these appear in your homepage meta title. Set them clearly under Settings → General.
- Search appearance for posts and pages – make sure the meta title format is set to something like: Post Title | Site Name.
- Noindex settings – tag archives, date archives, and author pages should typically be set to noindex to avoid thin content issues.
- XML sitemap – enable it and submit the URL to Google Search Console (covered in Step 7).
Want these settings checked automatically instead of by hand? Audit your WordPress website with ActionSEO.
SCREENSHOT – Rank Math showing meta title format field
Step 3: On-Page SEO — Optimizing Every Post and Page
Every post and page you publish in WordPress should be individually optimized. Your SEO plugin adds a panel at the bottom of the post editor (or in the sidebar) where you can control the key on-page elements. For the full framework, see on-page SEO for beginners.
Meta Title
Your meta title is what appears as the clickable headline in Google search results. It should include your target keyword naturally, stay under 60 characters, and be compelling enough to earn a click. Avoid repeating the site name if your plugin template already appends it automatically.
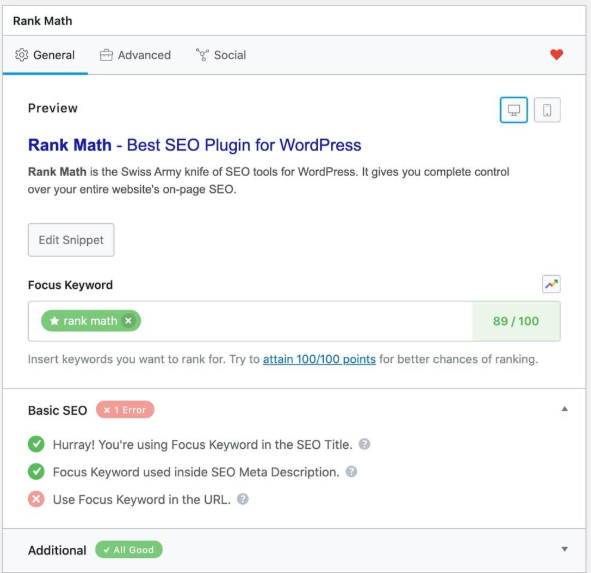
SCREENSHOT: Rank Math post editor panel
Meta Description
The meta description does not directly affect rankings, but it affects click-through rate – which does. Write a 150 –160 character description that summarizes the page and gives readers a reason to click. Include the keyword naturally; Google will bold it in the results if it matches the search query.
Focus Keyword
Both Rank Math and Yoast ask for a focus keyword. This tells the plugin what to check your content against. Enter your primary keyword here and follow the suggestions the plugin gives, but treat them as a guide, not a rulebook. The plugin does not know your audience; you do.
Headings Structure (H1, H2, H3)
Every page should have exactly one H1, your main title. Use H2 for major sections and H3 for subsections within those. WordPress automatically applies H1 to your post title, so do not add another H1 manually inside your content. A clear heading structure helps both readers and Google understand how your content is organized.
Slug (URL)
WordPress auto-generates a slug from your post title. Edit it to keep it short and keyword-focused. Remove stop words like “a,” “the,” “and,” and “how-to.” For this post, for example, a clean slug would be: /wordpress-seo-guide-for-beginners/
For a complete on-page checklist covering every element you need to review before publishing, use our SEO Checklist.
Step 4: Writing Content That WordPress (and Google) Will Reward
No plugin setting will compensate for weak content. This is the part where most beginners either get it right or lose months of effort on pages that never rank.
Write for Search Intent First
Before writing a single word, search your target keyword in Google and study what is already ranking on page one. Is it a list? A how-to guide? A comparison? That is Google telling you what format the searcher wants. Matching that format is not copying; it is understanding intent.
Use the WordPress Block Editor Strategically
The Gutenberg block editor is more than a writing tool; it helps you structure content in a way that improves readability and, by extension, SEO. Use:
- Heading blocks – properly set as H2 or H3 (not styled paragraphs)
- List blocks – for scannable bullet points
- Table blocks – for comparisons (Google often pulls these into featured snippets)
- Quote blocks – for citing stats or expert insights
- Separator blocks – to visually break up long sections
Internal Links: Connect Your Content
Every post you publish should link to at least 2–3 other relevant pages on your site. And when you publish new content, go back to older posts and add links pointing to the new one. This distributes authority across your site and helps Google understand the relationships between your content.
For example, a WordPress SEO guide naturally links to your SEO checklist, and that checklist page should link back to this guide. That bidirectional linking strengthens both pages.
Image ALT Text
Every image you upload to WordPress should have descriptive ALT text. In the block editor, click any image block and look for the “Alt text” field in the right-hand panel. Write a short, accurate description of the image, and where it fits naturally, including your keyword or a variation of it.
Step 5: WordPress-Specific Speed Issues (and How to Fix Them)
Speed is one area where WordPress sites have a well-known weak spot, not because WordPress is slow, but because it is so flexible that it is easy to accidentally make it slow. Here are the most common causes of slow WordPress sites and how to fix each one.
Problem 1: Unoptimized Images
Images are the most common culprit behind slow WordPress pages. Uploading a 5MB photograph and letting WordPress display it is one of the fastest ways to tank your Core Web Vitals score.
Fix: Install a plugin like ShortPixel or Smush to automatically compress images on upload. Set your maximum image width to 1200–1600px for most content. Use WebP format wherever possible; it delivers the same quality at roughly 30% smaller file size. WordPress has supported WebP since version 5.8.
Problem 2: No Caching
WordPress is a dynamic platform – by default, every page visit triggers a PHP process and database query. Caching stores a static version of your pages so repeat visitors (and Google’s crawlers) can load them almost instantly.
Fix: Install a caching plugin. WP Rocket is the most powerful option (paid), but W3 Total Cache or LiteSpeed Cache (if your host supports it) are strong free alternatives. Enable page caching, browser caching, and GZIP compression.
Problem 3: Too Many Plugins
Every active plugin adds code that runs on your site. Ten well-chosen plugins will outperform thirty poorly chosen ones. Audit your plugins regularly; if you are not actively using a plugin’s features, deactivate and delete it.
Rule of thumb: If two plugins do similar things, keep one. Duplicate functionality is one of the most common causes of unnecessary WordPress slowdown.
Problem 4: No Content Delivery Network (CDN)
A CDN stores copies of your site’s static files (images, CSS, JavaScript) on servers around the world. When a visitor loads your site, they receive files from the server closest to them, dramatically reducing load time for international visitors.
Fix: Cloudflare offers a generous free CDN tier that is easy to connect to WordPress. For most beginners, the free plan is more than sufficient.
Problem 5: Unoptimized Hosting
No amount of optimization will fully compensate for poor hosting. Shared hosting plans that put hundreds of sites on one server will always underperform compared to managed WordPress hosting.
If your Google PageSpeed Insights score is consistently low despite all other optimizations, your hosting may be the bottleneck. Consider upgrading to a managed WordPress host like Kinsta, WP Engine, or SiteGround.
Test your current speed at Google PageSpeed Insights, aim for a score above 80 on mobile and 90 on desktop.
Step 6: Technical WordPress SEO Settings to Know
WordPress gives you access to technical settings that can make a significant difference in how Google crawls and indexes your site. Handle these carefully; incorrect changes can accidentally hide your entire site from Google. For the fundamentals behind these settings, see technical SEO for beginners.
XML Sitemap
An XML sitemap is a file that lists all the important pages on your site, helping Google discover and index them efficiently. Your SEO plugin (Rank Math or Yoast) generates this automatically. The URL is usually something like: yourdomain.com/sitemap.xml (Rank Math) or yourdomain.com/sitemap_index.xml (Yoast).
Submit this URL in Google Search Console under Sitemaps. Do this once, and Google will revisit it automatically as you add new content.
Robots.txt
The robots.txt file tells search engine crawlers which parts of your site to access and which to ignore. WordPress creates a default virtual robots.txt that is safe for most sites. Do not edit this file unless you specifically know what you are changing and why a single incorrect line can block Google from your entire site.
Noindex Settings
Not every URL on your WordPress site deserves to be indexed. Tag archives, date archives, and author pages often contain duplicate or thin content that can dilute your site’s overall quality signal. In your SEO plugin’s settings, set these to noindex. Your posts and pages remain fully indexed – you are just keeping out the clutter.
Canonical Tags
If the same content appears at multiple URLs (for example, a post accessible at both /post-name/ and /?p=123), Google may see it as duplicate content. Canonical tags tell Google which version is the “official” one. Your SEO plugin handles this automatically, but it is worth confirming the canonical tag is set correctly on any page you are actively optimizing.
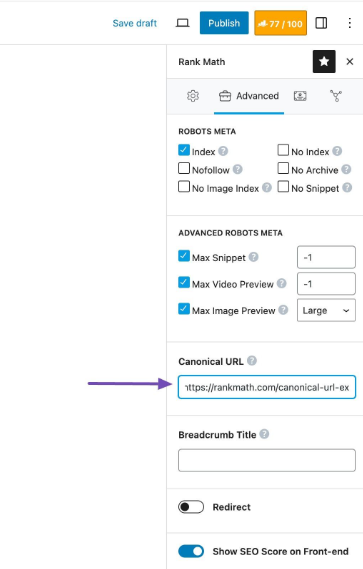
SCREENSHOT: Rank Math Canonical URL field
Step 7: Connect WordPress to Google Search Console
Google Search Console (GSC) is the most important free tool in your WordPress SEO toolkit. It shows you exactly how Google sees your site, which pages are indexed, which keywords you are ranking for, and what errors need fixing.
How to Connect WordPress to Google Search Console
- Go to Google Search Console and click “Add Property”
- Enter your domain and choose your verification method
- The easiest method for WordPress: use the HTML tag option and paste the verification code into your SEO plugin (Rank Math: General Settings → Webmaster Tools | Yoast: General → Webmaster Tools tab)
- Submit your sitemap URL under the Sitemaps section
[SCREENSHOT: Rank Math → General Settings → Webmaster Tools → Google Search Console verification field]
What to Monitor in GSC
- Coverage report – see which pages are indexed and which have errors
- Performance report – track impressions, clicks, and average position for your keywords
- Core Web Vitals – see real-world speed data for your pages, sourced from actual visitors
- Manual actions – check if any of your pages have been penalized by Google
Check Google Search Console at least once a week when you are actively publishing and building your site. For a full guide to reading and acting on your data, see our post on tracking SEO results.
Common WordPress SEO Mistakes That Hold Beginners Back
Even well-intentioned beginners make these mistakes. Recognizing them early saves months of wasted effort.
- Using the default WordPress permalink structure. If you launched your site without changing this, your URLs look like
/?p=123. Change this to “Post name” immediately, but be aware that changing URLs on a live site with existing content requires 301 redirects to preserve SEO value. - Installing too many plugins. Each plugin adds weight. Audit regularly and remove anything you do not actively use.
- Leaving the “Discourage search engines” setting on. During development, many WordPress installs check the box under Settings → Reading → Search Engine Visibility. This blocks all search engine indexing. It is one of the most common reasons a new site does not appear in Google at all.
- Not optimizing images before uploading. Uploading raw, full-resolution images is one of the fastest ways to slow your site. Resize and compress before uploading, or use an auto-optimization plugin.
- Ignoring the mobile experience. Google uses mobile-first indexing – it evaluates the mobile version of your site, not the desktop version. Test every page on a phone before publishing.
- Writing meta titles and descriptions that are too long. Google truncates titles over 60 characters and descriptions over 160. Your SEO plugin will show a live character counter — use it.
- Publishing pages with no internal links. Orphan pages (pages with no links pointing to them) are difficult for Google to find and rank. Every new page should be linked from at least one other page on your site.
Step 8: Monitor, Update, and Improve Over Time
WordPress SEO is not a one-time setup. It is an ongoing process of publishing, measuring, and improving. Here is a simple monthly rhythm to keep your site healthy:

- Check Google Search Console for new crawl errors, dropped rankings, or coverage issues.
- Review your top-performing pages in the Performance report. Are impressions growing? Are click-through rates improving?
- Update at least one older post with fresh information, improved structure, or better internal links. Refreshing content is one of the highest-ROI SEO activities available to you.
- Check your PageSpeed score after major plugin updates or theme changes, as these can introduce new performance regressions.
- Audit your internal links, as you publish more content, opportunities to connect older and newer posts will appear. Take them.
If you want a structured week-by-week plan rather than managing this yourself from scratch, our 14-Day Free SEO Action Plan gives you a clear sequence to follow.
Final Thoughts
WordPress gives you every tool you need to build a site that ranks well on Google. But tools only work when you know how to use them. The steps in this guide – from permalink settings and plugin configuration to image compression and Google Search Console – are the practical implementation layer that turns SEO theory into real results.
Work through each section one step at a time. You do not need to do everything at once. Start with your foundation (theme, HTTPS, permalinks), install your SEO plugin, and build from there. Want to double-check everything against a single list? Use the complete SEO checklist.
If you want a complete, step-by-step framework with real examples, checklists, and a 30-day action plan, the SEO in Action WordPress SEO framework is built exactly for WordPress site owners who want results without the guesswork.
Frequently Asked Questions
Do I need an SEO plugin for WordPress?
Yes. For most WordPress users, an SEO plugin is essential. WordPress does not give you built-in control over meta titles, meta descriptions, XML sitemaps, or structured data. An SEO plugin like Rank Math or Yoast SEO adds all of these capabilities through a simple dashboard interface, without requiring any coding knowledge. Install one when you set up your site and configure it using the setup wizard before publishing any content.
What is the best SEO plugin for WordPress beginners?
Both Rank Math and Yoast SEO are excellent for beginners. Rank Math’s free version offers more features out of the box, including schema markup, a redirect manager, and keyword rank tracking. Yoast SEO has a slightly simpler interface that some beginners find easier to navigate. Both are trusted by millions of sites. The most important thing is to install one and configure it properly; do not install both, as they will conflict with each other.
How do I check if my WordPress site is indexed by Google?
The quickest way is to search site:yourdomain.com in Google. If pages appear in the results, they are indexed. For a more detailed view, connect your site to Google Search Console and check the Coverage report, which shows exactly which pages are indexed, which are excluded, and why. Also check Settings → Reading in WordPress and confirm the “Discourage search engines” checkbox is NOT ticked, as this is a common cause of indexing problems on new sites.
Why is my WordPress site slow, and how do I fix it?
The most common causes of slow WordPress sites are unoptimized images, no caching plugin installed, too many active plugins, and poor-quality hosting. Start by testing your site at Google PageSpeed Insights. Then install an image compression plugin (ShortPixel or Smush), add a caching plugin (WP Rocket or W3 Total Cache), remove any plugins you do not actively use, and consider adding Cloudflare as a free CDN. If your score remains low after all of these steps, your hosting plan may need upgrading.
How often should I update my WordPress site for SEO?
You should publish new content consistently – at minimum once or twice a month – and review older posts every three to six months. SEO rewards active, regularly updated sites. Updating an older post with fresh information, better internal links, and improved structure can often produce faster ranking improvements than publishing a brand-new page. Monitor your performance monthly in Google Search Console and prioritize updates for pages that have high impressions but low click-through rates.